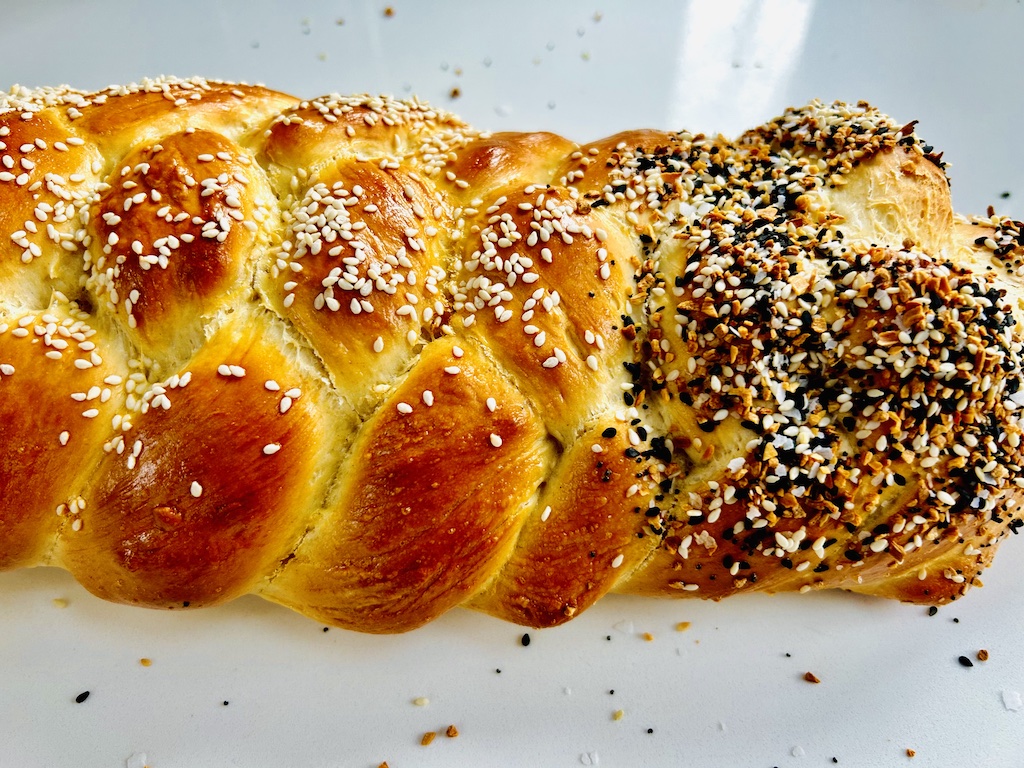
Challah Bread
Equipment
- Stand mixer or large mixing bowl
- Measuring cups and spoons
- baking sheet
Ingredients
- 1 c warm water plus 1 T sugar
- 1 packet active dry yeast (you can also use fast acting)
- 4-41/2 c all purpose flour or 1:1 gluten free flour blend
- 1/4 c white sugar
- 1/4 c melted butter or oil if keeping it kosher.
- 1 1/2 tsp salt
- 2 eggs
- 1 egg plus 1 T water beaten together for egg wash
- optional: poppy seeds, sesame seeds, everything seasoning, any other topping you feel like getting creative with.
Instructions
This is for my online Challah (pronounced “ha-luh” – the c is silent) Bread baking class- the video can be viewed on my FB page after the live class on February 4th here: https://www.facebook.com/beckysmindfulkitchen. This is not a difficult bread- don't be intimidated by the number of steps, I wrote a lot to try to be as helpful as possible for those who can't attend the class.
- Measure out 1c of water in a liquid measuring cup. If you don't have a liquid measuring cup, don't worry, just add 1c of warm water to a small bowl. Your water should be around 100 degrees- think warm but not hot. If using fast rising yeast, you can skip this step all together and add yeast to the flour mixture, but I tend to do this step regardless. Remember when using liquid measuring cups to measure at eye level.
- Add in the 1 T of sugar and stir.
- Sprinkle packet of yeast on top of water and let sit for a few minutes- you want to see bubbles form/the yeast to grow (bloom). If there is no change, swirl yeast in water and wait a few more minutes. If there is still no change, mark time of death for the yeast, toss and start over. Better to know now than have your bread not rise at all!
- While yeast is blooming, in a large mixing bowl or stand mixer, add flour (spoon and level to measure flour, start with 4 cups and reserve the extra 1/2c if needed after adding your water), sugar and salt and mix together with a spoon or your hands if you don't mind floury hands. Then form a well in the middle and add in the eggs and melted butter/oil. Using a fork, beat the eggs, then mix the eggs and oil into the flour. Add the yeasty water (sounds so delicious eh?) and start forming then kneading your dough. You'll be using the dough hook attachment if using a stand mixer or your hands if doing it manually. If your dough is too wet- it won't come together in a soft ball, add a bit more flour at a time. Once your dough is the right consistency keep kneading for about 5 minutes until it is soft and elastic. You want to make, as a I call it, 'happy dough', dough that if it wasn't dough, would feel darn good to rest your head on and take a nap.
- At this stage you can transfer the dough to a clean, slightly oiled bowl to rise, or do what I often do which is use a plastic dough scraper (or your hands), separate dough from the bowl, then place it back down and cover with a dishtowel or plastic wrap and place near a sunny window, or a part of your home that isn't cold. The dough will rise for 60-90ish minutes in a warm part of your home, warm meaning 70ish degrees or you can even leave it in the fridge overnight to rise as you would brioche dough. If I'm going to be gone for the day, I'll pop it in the fridge for 5-8hours too. You want the dough to about double in size. So if after 90 minutes it hasn't done much, wait another 30 minutes.
- After it has risen, remove from the bowl and divide into however many strands you plan on braiding. To keep it simple, do 3. I usually do 6. You can do more 9 or 12 but you won't get a big wow factor for the effort you put into doing it, so my recommendation is to keep to 6. After you have divided your dough into 3 or 6 sections, you will roll each one out into a rope about 10-12in long. If they keep shrinking on you, it means the gluten needs to relax, so simply leave the dough a long for a few minutes then try again.
- Gather the strands and pinch them together at the top. You want to have each strand be close to the same length and size. But don't spend forever getting them perfect, especially for your first time. The goal is to learn how to do the plaiting and if it doesn't look perfect it will still taste great.
- For 3 strands, simply braid as if you were braiding hair. For 6: 1) Take the strand on the left and bring it over 2 strands, under the 3, and over the final 2. 2)That strand now becomes the last strand on the right. 3)Go back to the strand on the left, and repeat- over 2, under 1, over 2. 4) rinse and repeat until no dough remains. You will need to at times readjust the strands to keep the loaf from drifting left. You also want to keep these braids tight, so as needed, stop and tighten strands to avoid gaps. Pinch the bottom together and smush loaf a bit as if fluffing a pillow from the sides and top and bottom, if needed to close up any gaps.
- Transfer loaf onto a parchment lined baking sheet ( or non stick or slightly greased and floured).
- Cover once more and let rise for about an hour.
- After an hour (or if your oven takes awhile to preheat, shortly before the hour is up), preheat the oven to 350 degrees F.
- In a small bowl, crack an egg and add a dash (1T ish) of water and beat well. Then using a brush, cover the dough including the cracks with egg wash or if you don't have one you can spoon some over the dough and use a balled up paper towel to spread or dip paper towel into egg wash and wipe onto the dough. Make sure to get the sides of the dough as well. You will have leftover egg wash.
- Add any toppings if you want to leave as is.
- Bake for 30-40 min (depends on thickness of your loaf and oven temp vary). I look for a slightly golden brown loaf.
- I am supposed to remind you to wait for bread to cool before cutting into it, but I cannot tell you to do something that I do not do myself. This bread can simply be torn into and slathered with butter or dipped into soups. Or you can cut it into slices for amazing sandwiches. The following day, use slices for French toast- you won't regret it.
- We never have to worry about storing the bread because it doesn't last beyond the first 2 days, BUT, should you want to store it, simply put it in a plastic bag or cover in plastic wrap. You can also freeze it, but I do suggest slicing it first and then using it for French toast or for a grilled cheese style sandwich. When does the bread go bad? The best thing about fresh bread is that it tells you when it is bad by growing mold. When there is mold, it has gone bad. When it is simply stale, it has become ready for French toast.
- Can you double the recipe? Yes. But divide dough in half before rising. There are many variations of this recipe online, this is a jumble of a few and just the measurements I find myself using, but I also do not exactly measure most of the ingredients when I bake this bread. So have fun experimenting and making this recipe even better!
Notes
Challah is a bread used during Jewish rituals and is called simply “Challah” but often is referred as challah bread, which yes, is redundant but helps those who don’t know yet what challah is. It has a beautiful and rich tradition in the Jewish religion and culture and I have included just a brief overview from an article shared on the Maltz Museum website by Laura Steefel-Moore. Full article HERE.
- Shabbat meals on Friday evenings and holiday meals include two loaves of challah, or, in the plural form, two challot. This double portion of challah represents the double portion of manna (food from heaven) that God sent to the Israelites during their Exodus from Egypt on Fridays so that they would not have to gather it on Shabbat the following day.
- The poppy seeds or sesame seeds that are sometimes sprinkled on challah may also represent the manna falling from heaven.
- During a traditional Shabbat evening, the challah is covered by a decorative challah cover. The cover represents the layer of dew that enclosed the manna and kept it fresh during the Exodus and also keeps the challah from being “shamed” by the fact that the wine is drunk before the bread is eaten during the Shabbat service.The cover also beautifies the challah.
- Challah loaves are often braided. The three strands of the braid may represent truth, peace and justice. Another interpretation is that having two loaves of three-stranded braids equals six total strands, which symbolize the six work days of the week aside from Shabbat. Challah made for Rosh Hashanah is round, to represent continuity without beginning or end. Challah can also be made into many other shapes to commemorate aspects of other holidays.
- The word challah may be derived from an ancient Hebrew word that meant “portion.” In Biblical times, Jews were to give a portion of their bread to the kohanim, or priests, every Sabbath. In post-Temple times, since there are no longer priests to receive the sacrifice, women baking bread are supposed to burn a small piece of it at home while reciting a blessing.
Challah Bread Recipe